Characters
A project character is a profile plus a set of images: portraits from every side, a layout, an emotion sheet and the character sheet assembled from them, the main character reference for frames. Here you also set height for scale and outfits — the same character in different clothes.
On this page
- What you will get
- How the Characters section works
- Create a character with the agent
- Ask the assistant
- Or create one manually
- Check the profile
- Generate the portrait
- Generate the layout
- Generate the emotion sheet
- Fix a cell with an outline
- Assemble the character sheet
- Set the scale
- Scale sheet
- Scale in video generation
- Add an outfit
- What’s next
What you will get#
- Profile
- Portrait
- Views
- Layout
- Emotions
- Correction
- Character sheet
- Scale
- Outfit
- Needs
- A project with a script
- Section
- Characters
- Generations
- Portraits, layouts, emotions, outfit
How the Characters section works#
- Left — the project menu. “Characters” is the first item in the “Assets” group.
- Top — the project’s characters. A strip: Rover 1987, Yo Gun, the hedgehogs (crowd), Ulyana; the top bar has Add character and Scale.
- Center — the character card. References, portrait, layout, emotion sheet and character sheet; below them, video demos, outfits and voices.
- Right — the agent and the profile. The Characters assistant chat and the character profile, with the Prompt / Assistant switch between them.
01Create a character with the agent#
The section’s agent is the Characters assistant: it reads the project script and fills in the character profile itself.
Ask the assistant#
Write who to create, or click the Create a character suggestion above the field. If the characters are already in the script, one sentence is enough:
Create the characters from the script and give them names
The agent creates the character and the profile but does not generate images. You start those yourself — with the buttons on the card or by asking in the chat. How we created the characters of «Роверы и ёжики» with height and appearance in a single task — see the “From fairy tale to film” guide.
Or create one manually#
Add character on the top bar opens the “New character” window — it has only a name. Fill in the profile yourself later or ask the agent.
Check the profile#
Open the profile with the Prompt / Assistant switch below the chat. It is the text foundation of every generation of the character: each trait has a colored label.
| Label | What it holds |
|---|---|
| Height | Height in centimeters. Used in generations, more in the “Scale” step |
| Appearance | Face, build, age — what the model keeps in every frame |
| Visual details | A description for the models in English: silhouette, clothes, colors |
| Role, Personality | Help the agents with the script and storyboard |
Important
If the height is not clear from the script, the agent does not make it up, and the platform treats the character as 180 cm tall. Check the “Height” label — the proportions depend on it. Yo Gun is 20 cm.
02Generate the portrait#
In the Portrait block, click Generate portrait. The front view is the base image: the other views, the layout and the emotion sheet are built from it.
Below the portrait is a strip of six views: Front, 3/4 left, 3/4 right, Left profile, Right profile, Back. Open an empty view and click the button with its name, for example Generate 3/4 left. You can start all of them at once — generations run in parallel.
Above the portrait are action icons: , , , . On the right — and .
Tip
Get the front view right first, with corrections if needed. The views, layout and emotions inherit the face from it.
03Generate the layout#
The Layout block has two thumbnails at the bottom: “Full body” and “Headless”. Select “Full body” and click Generate — or if there is already a layout. You get a sheet with the character from every side: from it the model understands the figure, costume and shoes.
“Headless” is built from the full-body layout: the same body and costume, but without the head.
Why
The face comes into the character sheet from the six portraits, and the body from the headless layout. If the layout keeps the head too, the model has two sources for the face, and they compete. Without the head each reference does its own job: the portraits handle the face, the layout handles the figure, height and costume.
04Generate the emotion sheet#
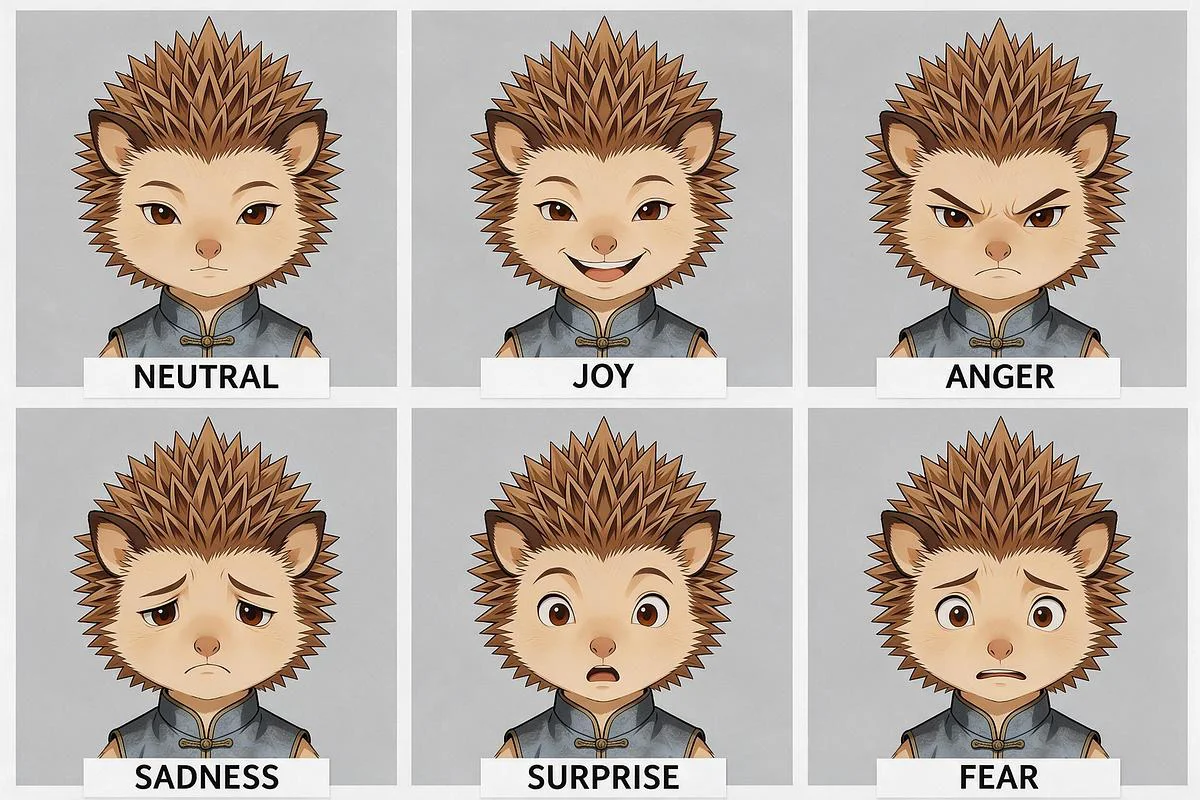
In the Emotion sheet block, click Generate. The platform takes the portrait and draws six states: NEUTRAL, JOY, ANGER, SADNESS, SURPRISE, FEAR.
Fix a cell with an outline#
A bad detail is easier to fix than to regenerate the whole sheet. Yo Gun’s sixth cell came out with fear, but in the story he falls asleep at the end.
- Click above the sheet — the editor opens.
- Outline the cell with the brush.
- Describe the fix and click to the right of the field.

The corrected sheet is saved as a new version — the counter above the sheet now shows “2”, and the previous version is kept. Besides the brush, the editor has an oval, arrows and text.
05Assemble the character sheet#
Click Create character sheet. This is not a generation: in seconds the platform puts the finished images on one sheet.
- on the left, the six portrait views;
- top right, the layout (headless, if there is one);
- bottom right, the emotion sheet.
If you change the portrait, layout or emotions after assembly, a appears by the heading with the hint “References changed — recreate the character sheet”. Click in the corner of the sheet.
06Set the scale#
The height from the profile sets the character’s size relative to the others. In «Роверы и ёжики» this is the key point: 20-centimeter hedgehogs, a 70-centimeter rover and 110-centimeter Ulyana.
Scale sheet#
Click Scale on the top bar. In the “Character scale sheet” window all the project’s characters stand on one line, each with a name and height below.
- If a character is a gray silhouette, click by its figure. The A-pose needs a character sheet or a layout.
- To change the height, hover over the character and drag a corner of the frame — or type a number in the field that appears next to it.
Scale in video generation#
In a shot with two or more characters, open the Video tab and turn on Consider character scale in the settings. A scale sheet with this shot’s characters is attached to the generation, and the height difference holds in the frame.
The “character scale sheet” link in the hint shows what goes into the generation. The warning below means one of the shot’s characters has no A-pose yet and will not be on the sheet.
Important
Scale is used only in video generation and only with two or more characters in the shot.
07Add an outfit#
An outfit is the same character in different clothes: for a beach scene, a holiday or the weather. Outfits are at the bottom of the character card.
Ask the characters assistant — for example, “create a summer outfit for Ulyana: a bucket hat and a sundress” — or click Add outfit. The “New outfit” window has two fields: the name and a description of clothes, shoes and accessories — the description goes into the prompt. The Generate button creates the outfit and starts the generation right away.
The platform takes the character’s base layout and changes only the clothes, shoes and accessories from the description — the face, figure and height stay the same.
Important
An outfit needs the character’s base full-body layout. Without it the generate button is disabled.
In a shot, pick the outfit in the panel: a picker appears under the character — “Default outfit” or the one you created. If you delete an outfit, shots that use it go back to the default one.
What’s next#
Run the emotion, gait and action video demos — these blocks are on the character card above the outfits. Locations and props are created the same way — see the “Locations” and “Props” guides.
Updated October 18, 2026