From fairy tale to film
An end-to-end path through Frameriver on a real project: from the text of a fairy tale to a script, characters, locations, 27 shots, camera flythroughs in 3D scenes, video with sound, a narrator's voice and a finished 2 minute 14 second film. Every step is done in the interface, and all prompts are the ones we sent to the assistants.
On this page
- What you will get
- What you get
- Create the project
- Project style
- Default video
- Write the script
- Edit through drafts
- Create the scenes
- Create the characters
- References and portrait
- Fix an emotion with an outline
- Create the locations
- Break the scenes into shots
- Prepare flythroughs in 3D scenes
- Generate the key frames
- Generate video drafts
- Voice the narrator
- Watch and merge the film
- What’s next
What you will get#
- Project
- Script
- Characters
- Locations
- Shots
- 3D previzes
- Key frames
- Video
- Voiceover
- Merge
- Needs
- The text of a fairy tale or story
- Section
- The whole project
- Generations
- Images, video drafts, voiceover
What you get#
The fairy tale behind the project «Роверы и ёжики. Зимняя доставка» (Rovers and Hedgehogs. Winter Delivery): just before New Year, hedgehogs in a café on Arbat plot to take over the world, a delivery robot overhears the conspiracy, and the rovers lure the hedgehogs into their containers with apples and take them to the zoo to sleep. From this text we made a 2 minute 14 second short film: 8 scenes, 27 shots, a narrator’s voice-over.
The style is a volumetric 3D world with flat, almost hand-drawn characters. The videos are Seedance 2.5 drafts in 480p with the model’s own sound: noises and ambience, no music or speech. Music is easier to add in the final edit outside the platform.
01Create the project#
On the home page, click New project and choose the Short film type — one film: scenes and shots right away, without seasons and episodes. The type cannot be changed after creation.
The second step has Name and Idea / logline. Paste the whole text of the fairy tale into the logline: it becomes the project’s original story, and the assistant will later write the script from it.
Project style#
Turn on Catalog styles and pick a visual medium. The medium is mixed into every generation of the project: characters, locations, frames and video. So a mixed style — a 3D environment with flat characters — has to be described as one medium rather than set separately for characters and locations.
Next: Film duration (sec, max 600) 150 seconds, genre “Fairy tale”, tone “Ironic”, frame format 16:9.
Why
Genre and tone also go into the prompts. The “Ironic” tone noticeably affects the assistants’ writing: the script got jokes like “flat out means nineteen kilometers per hour”.
Default video#
Open Generation parameters: video model Seedance 2.5, resolution 480p, and check Generate synchronized audio and Seedance: draft at 480p by default. Now every shot generates a cheap draft with sound by default.
On the last step, check the summary. Leave LLM auto-generation off: we will create scenes, characters and locations from the script, which makes them easier to control. Click Create project.
02Write the script#
Open Script and click Write script for the film. On the right is the Script assistant. It sees the project’s original story, so one task with the key decisions is enough: duration, number of scenes, narration only, and the characters’ names.
Write a 2.5-minute short film script from the project's original story (the fairy tale): 8 scenes with INT./EXT. headings, narrator voice-over only, no character dialogue. The characters are: Rover 1987, Yo Gun (the hedgehogs' ringleader), Hedgehogs, Ulyana (a young zookeeper). Locations: the Hedgehog Café on Arbat, Arbat by the Vakhtangov Theatre with the Turandot fountain, a fruit stall, the Garden Ring in a snowstorm, the entrance to the Moscow Zoo, the hedgehog enclosure. Save it as a draft.
Why
Narration only is a deliberate choice. Without dialogue there is no need for lip sync, and the narrator’s voice later goes over the shots as a separate track.
Edit through drafts#
The assistant saves its answer as a draft; the script itself does not change. You can compare the draft with the current text inline or in Side by side mode. We noticed a typo and an unfortunate detail and asked for a fix:
Great draft. Fix two things: “NARATOR” → “NARRATOR” in every line; Ulyana carries the hedgehogs in mittens, not gloves. Save it as a new draft.
All drafts and the edit history are on the Versions tab. Apply the draft you need with Apply and confirm with Confirm.
Create the scenes#
On the Scenes tab, click Update episode scenes: each INT./EXT. heading becomes a project scene. We got 8 scenes.
03Create the characters#
In the Characters section, ask the Characters assistant to create the characters from the script. It fills in the profiles — appearance, height, personality, voice — but does not generate images.
Create the characters from the script: Rover 1987, Yo Gun, Hedgehogs (crowd), Ulyana. Height: Rover 1987 — 70 cm (120 cm with the flag), Yo Gun and the hedgehogs — 20 cm, Ulyana — 110 cm. Yo Gun is a hedgehog with slightly Asian features: almond-shaped eyes, a small silk vest with a mandarin collar, no caricature. Ulyana is a young zookeeper: a red knitted hat with a leaf, a turquoise scarf, a brown patterned coat, bright orange-and-blue mittens. Rover 1987 is a six-wheeled delivery robot: a white body, a red-orange side panel reading “fr 1987”, a black “face” with two vertical LED strips for eyes, a lidar on top, an orange flag on a mast, a hinged lid, and a red foil-lined box inside.
Why
Height is set explicitly because the film puts 20-centimeter hedgehogs, a 70-centimeter robot and a girl side by side. Without a height, the platform treats a character as 180 cm tall.
References and portrait#
If a character has a real-life prototype, upload a photo: → Upload file. For the rover we uploaded three photos of a delivery robot, for Ulyana a photo of a girl. Generations use them as design references.
Then, for each character in order:
- Portrait. Generate portrait — the front view, the character’s base image.
- Views. In the strip under the portrait, select “3/4 left”, “3/4 right”, “Left profile”, “Right profile”, “Back” and click the view’s generate button. In our style the views matter most: a flat character does not rotate in 3D but switches between drawn sides.
- Layout. In the Layout block, Generate: the character full-body from every side.
- Character sheet. Create character sheet puts the portraits, layout and emotions into one reference for frames.
Fix an emotion with an outline#
For the hedgehogs’ ringleader we also generated an Emotion sheet. The sixth cell came out with fear, but in the story Yo Gun falls asleep at the end. There is no need to redo the whole sheet.
Click above the sheet, outline the cell with the brush and describe the fix:
In the outlined cell, replace fear with sleepiness: eyes drooping, Yo Gun yawning sweetly, label SLEEPY. Leave the other cells unchanged.

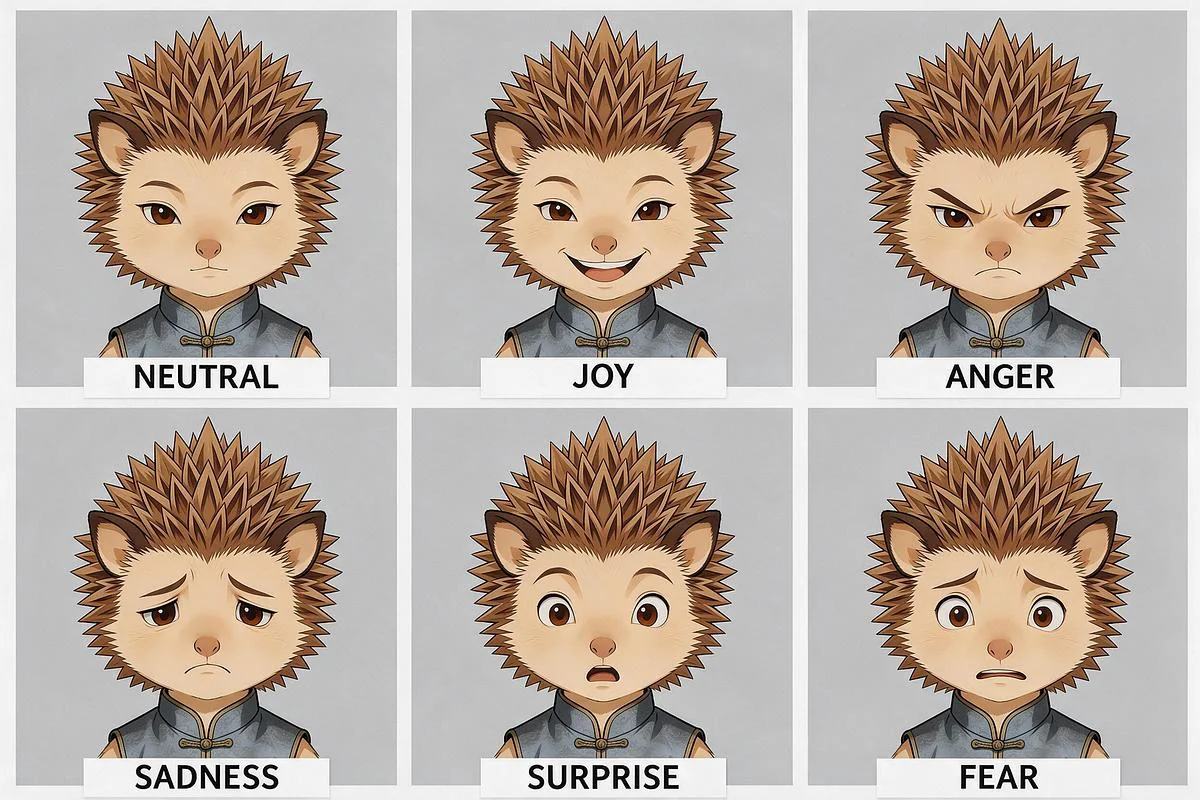
The corrected sheet becomes a new version, and the character sheet is assembled from it.
04Create the locations#
In the Locations section, ask the Locations assistant to create all the settings in one message:
Create the locations from the script. The Hedgehog Café on Arbat — interior: tiny hedgehog furniture, garlands, candles, a window onto snowy Arbat; used in scenes 1 and 5. Arbat — a pedestrian street on a winter night, streetlights, snowdrifts. The Turandot fountain by the Vakhtangov Theatre — a golden statue of the princess under an openwork crown, a granite basin with steps, the theatre's orange facade; the rovers park here. The fruit stall — a shop window with apples and dried mushrooms. The Garden Ring — a wide avenue in a snowstorm, red car lights. The entrance to the Moscow Zoo — the gates at dawn after the snowstorm. The hedgehog enclosure — a spring enclosure with grass, a straw hut and saucers. Time: Moscow just before New Year, night, snow — except the enclosure.
Models know real places poorly. For the Turandot fountain we uploaded three photos to — and the fountain came out recognizable.
Then each location gets Generate 3/4, and the street ones also get cardinal directions: Generate North. The cardinal directions come in handy for 3D scenes.
05Break the scenes into shots#
The assistant can split the scenes into shots on its own, but the frames come out bland: everything in medium shots. So we wrote a shot list in advance with varied shot sizes and angles — from above, from below, over the shoulder, from inside a container, flythroughs — and gave it to the Project assistant on the Storyboard. Here is the start of the message:
Break the scenes into shots using this shot list: numbers, durations, characters and locations as given; keep the angles. Link the characters and locations to the shots. Sound in the shots is ambience and noises only, no music and no speech. Scene 1 (location: the Hedgehog Café on Arbat): 1.1 — 6 s. Location Arbat. High angle from roof level, the camera smoothly descends to the warm window of the hedgehog café; at the door, tiny Rover 1987 with an order. 1.2 — 4 s. Hedgehogs. Extreme close-up: paws stick needles into a world map on the table, a candle flame flickers. 1.3 — 5 s. Yo Gun, Hedgehogs. Low angle from table level, a hedgehog's quills blurred in the foreground: Yo Gun on a stump podium gives a speech, behind him a screen with crossed-out gloves. …
Important
Paste a long shot list into the field in full, as one message. If you send the intro separately, the assistant will reply that it does not see the shot list.
The assistant created 27 shots, linked the characters and locations, and picked cameras. It added the line “no music and no speech” to every shot’s video prompt — that is the instruction for Seedance’s sound.
06Prepare flythroughs in 3D scenes#
For three shots with camera movement — the descent to the café (1.1), the flythrough along Arbat (2.3) and the flight over the column on the Garden Ring (6.1) — we recorded previzes in the 3D Scenes section. A previz is a rough flythrough video of a simple 3D scene: the video model repeats its camera path and blocking and takes the style from the references.
Scenes, paths and flight recording in detail — see the “3D Scenes” guide. Here is the task the 3D scenes assistant used to place the column of rovers and set the flythrough for shot 6.1:
Place a column of four rovers in the middle of the avenue, one behind another, 3 m apart, with Rover 1987 in front (mark the others with 0.7 m cylinders). Set a 7-second flythrough: the camera flies at a height of 9 m beside and slightly behind the column, parallel to it, smoothly overtaking it; the camera watches Rover 1987.
Link a saved previz to the shot on the Previz tab: From library → the 3D scene folder → Set as shot previz.
Tip
It is easier to prepare scenes in advance in the 3D Scenes section and just pick a finished flythrough from the shot.
07Generate the key frames#
On the Storyboard, select shots: Shift+click a card’s caption. Create frames and Create video appear at the bottom with the number of selected shots. We selected all 27 and started the frames.
Important
A batch from “Create frames (N)” is one task: its shots are generated one after another. For images that is bearable, for video it is slow. Start video one shot or one scene at a time: then the tasks run in parallel.
Review the frames before spending money on video. A bad frame is fixed the same way as the emotion sheet — with and an outline.
08Generate video drafts#
Open a shot by clicking its frame and go to the Video tab. Thanks to the project settings, the button already reads Generate draft — Seedance 2.5, 480p, with sound. The price is shown under the button: a 6-second draft costs 240 ₽.
On shots with a previz, turn on Send previz → Original before generating: the previz goes to the model as a reference video — movement, framing, timing.
The arrows in the shot header switch to the neighboring shot — a handy way to go through all 27 in a row and start each one separately.
Important
Seedance sometimes rejects the sound over possible copyright violations — this happened with shot 8.1. Just generate the draft again.
09Voice the narrator#
The narrator’s voice is the last step before merging. A new video generation of a shot clears its timeline along with the voiceover tracks.
We split the tale into short phrases — one per shot, matching the shot’s length. On export the sound is cut at the end of the shot’s video, so the phrase has to fit inside it.
On the shot timeline, click → Audio track, then in the track header. Type the phrase, pick a voice and click Generate.
For the narrator we used the male voice Reliable Man from the MiniMax library. The voice is picked in the same list: character voices first, then the ElevenLabs and MiniMax libraries below, each with a preview.
The finished voiceover lands as a clip on the “Audio” track; you can move and cut it. The Seedance sound stays on the video track.
10Watch and merge the film#
Open Studio and assembly. On the Studio tab the whole film already plays straight through, with the voiceover, even before merging: the strip at the bottom is all the shots, on the right are the selected shot’s versions. This makes it easy to find a weak shot and replace it.
On the Assembly tab, click Create assembly — the shots line up by scene, as on the Storyboard. Here you can reorder them and exclude them from the edit.
Click Merge episode. In the confirmation window you can substitute an animatic or a frame for missing video, turn on overlap and shot numbers. We left everything as is: No overlap → Merge.
A couple of minutes later the film appears on the Splices tab: 27 clips, 2:14. The Watch and Download buttons are above the assembly.
What’s next#
480p drafts are good for checking the film as a whole. Successful shots can be finalized in high resolution, and music added in the final edit.
Each section in detail — in the separate guides: “Script”, “Characters”, “Locations”, “3D Scenes”, “Storyboard”, “Shots” and “Studio and assembly”.
Updated October 18, 2026